Search Knowledge Base by Keyword
Media Guide
This page includes:
- Photo Sizes
- File Formats
- Max File Size
- Optimizing Files
- Naming Media Files
- Replacing Media Files
- Avoid Text in Images
- Using Logos or Graphics
- Cropping Tips for Hero - Flexible, Full Width
Photo Sizes
Images added to most WordPress modules need to be in one of 2 standard sizes. However, non-standard images may be used inside the Basic Content module.
Square: 768 x 768
- Used on top of page Hero - Flexible when image is on left/right
- Used on Image 1/2 and Text Module
- Required size for People Profile template
Rectangle: 1600 x 900
- Used on top of page Hero - Flexible for full width selection (see below)
- Used on Image 2/3 and Text module
- Required size for Article, Events and News featured images
- This is 16:9 aspect ratio (video)
Non-Standard Sizes
- Non-standard images may be used inside the Basic Content module.
File Formats
WordPress Requires JPG or PNG Files for photos.
Optimizing images (which decreases their file size) can often yield some of the largest performance improvements, resulting in shorter page downloads for users and better SEO ranking for the website.
Images
JPG
-
- Preferred format for quality vs file size.
- Keep below 250k, the lower the better.
- You can adjust the quality level for a good balance of quality and file size.
- In general, images with more pixel detailed information will generate larger file sizes, whereas soft blurry images generate smaller files sizes. It's best to see what the lower settings look like first and change settings to better quality if necessary.
PNG
-
- Produces higher quality images, but also has a larger file size.
Videos
- Videos may not be uploaded to WordPress. Get more information in the Video Guide.
Documents
- PDFs, Microsoft Word, Excel and Powerpoint documents may be uploaded and linked to from the media library.
Max File Size
Maximum upload file size: 1 MB.
- The maximum upload file size for all media types is 1 MB.
- Videos cannot be uploaded to the Media Library due to file size. See the Video Guide for how to display video.
Optimizing Files
Photos
- When saving JPG files, when possible compress files to be under 200 KB
- Maximum upload file size: 1 MB
- Smush is an extra layer of automated image optimization applied to images when uploaded to WordPress.
PDFs
- Documents saved as PDFs can easily be too large for the 1 MB max upload size.
- User Adobe Acrobat or their free compression site to reduce the file size.
Naming Media Files
When naming images, make sure to use key words that will make them easier to find when searching in the Media Library.
Naming Convention
- All lowercase
- Describe the image
- Use dashes between words (example: student-researching-library)
Describing the Image
Google likes good descriptions.
We want Google to know what the image is about without even looking at it, so use the main point of focus in the image file name.
For example, if your image shows a sunrise in Paris over Notre Dame Cathedral,
- Don't name it DSC4536.jpg or sunrisecathedral.jpg
- Do name it notre-dame-paris-sunrise.jpg
The main point of focus would be Notre Dame, as that is the main subject of the photo and why it’s at the beginning of the file name.
Replacing Media Files
When you need to update a file that has already been uploaded, please use the Replace media functionality in the Media Library.
Benefits include:
- A tidy Media Library
- Avoids duplicate files where someone else could accidentally grab an outdated version of a photo, graphic or document.
- Allows you to update a file without disrupting the page or what the file links to.
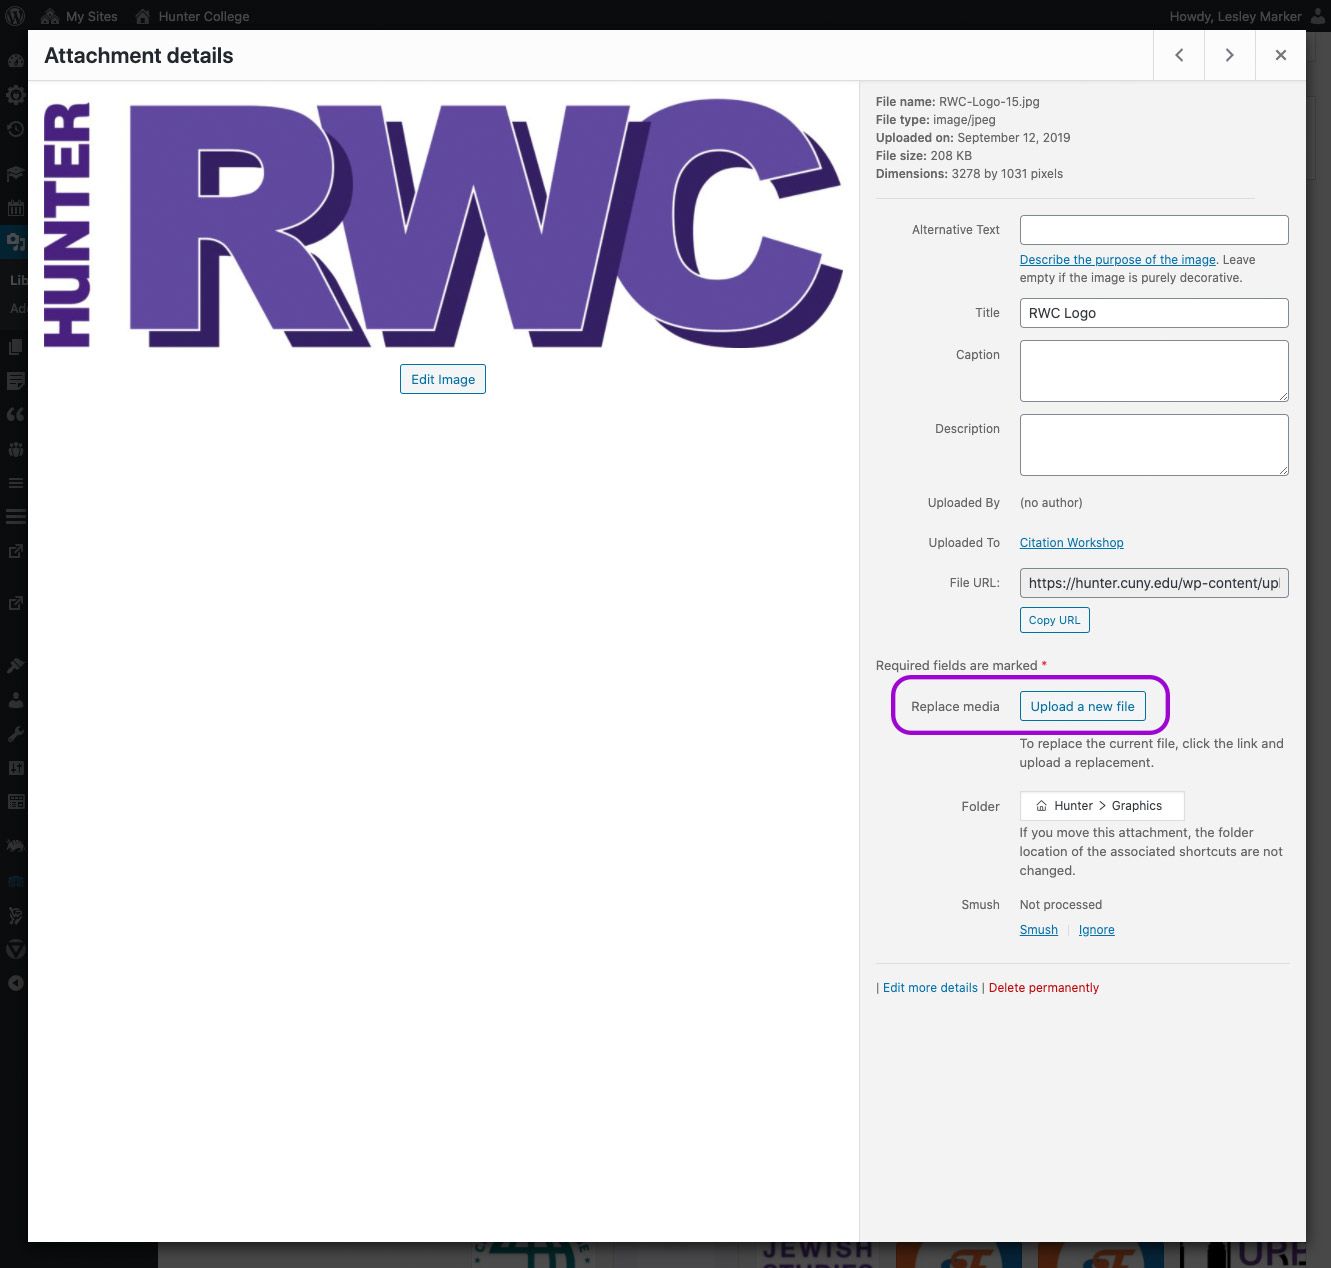
How to replace a file:
- Find the image or document to be replace in the Media Library
- Click on the file which will bring up the 'Attachment details' module
- Find the Replace media section and click Upload a new file

- Click Choose File to select the new file to be uploaded
- See Replacement options at bottom, usually you'll just want to replace the file and keep the date but other options are available.
- Note that there is no undo option after you upload and replace the file.
- Click Upload
Avoid Text in Images
Avoid putting text in images for several reasons:
- They are difficult, or even impossible, to read on mobile devices.
- Graphics with text embedded in them are not accessible.
- Text in images is not selectable or searchable by websites or operating systems, making them difficult to find.
Scientific notations exception:
- Text within scientific notations is acceptable with these requirements:
- Note that the caption of each notation should include a full description of the notation.
- Alt Text should say "Caption contains description of this image."
- Example is shown below.
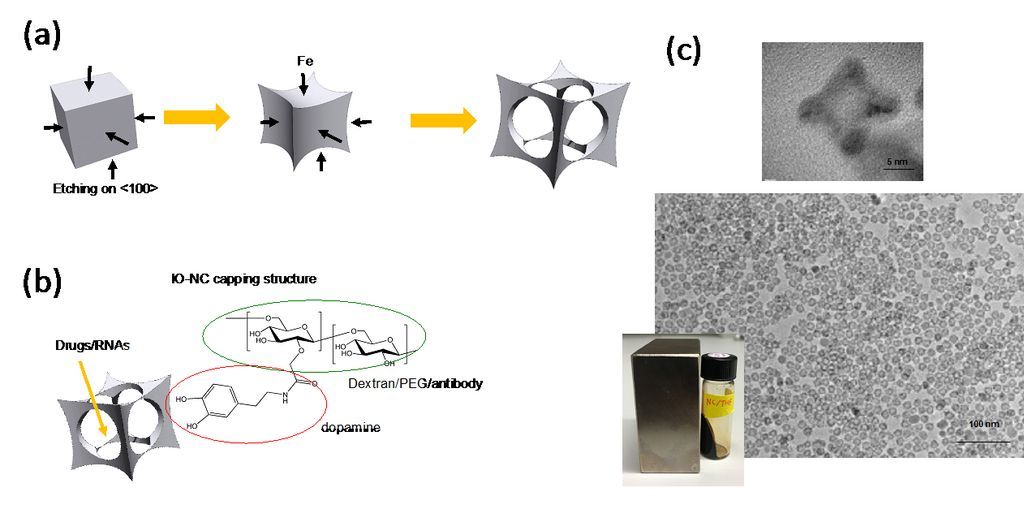
Figure 1. (a) Illustration of IO-nanocage fabrication process. Template cubic nanoparticles (MnO2 in this case) are transformed to iron oxide nanocages via Galvanic reactions (from left to right). (b) Structure of IO-nanocage. Capping molecules such as dextran and PEG (hydrophilic shell) can be conjugated with various moieties such as antibodies, dyes, and exosomes. (c) High resolution TEM (top) shows the cavity of nanocage. Low resolution TEM (middle) shows the monodisperse production, critical for high quality control necessary for medical applications. IO-nanocage is superparamagnetic (bottom), an important feature as MRI contrast agent.
Using Logos or Graphics
General tips:
- Use sparingly! Logos are better when they are known to the general public, otherwise they do not convey any meaning to the reader or insights into what the story is about. It's better to use a conceptual image instead.
- Book jackets in graphics are ok, but make sure to refer to the book name in the copy since it is likely to be unreadable on mobile.
Tips for logos on a white background
Graphics with a white background appear to float on the page.
Add a border to graphics or logos that do not have a background:
- Add to the full size image area (1600x900): 5px gray #CCCCCC or a color related to the brand.
- Make sure to leave enough white space around the graphic/logo, about 40 pixels when applied to the full size image. When it is displayed smaller, that space will also appear much smaller.
Cropping Tips for Hero - Flexible, Full Width
Top of page full width images need special consideration.
When choosing to use a Hero - Flexible module with a Full Width image, be aware of the image selection and cropping limitations.
In order to optimize the viewing space, hero images are vertically (in height) masked when displayed on desktop browsers and mobile screens display the full images. See below for examples.
Tips
- Choose an image that has flexibility with cropping.
- If there is subject matter that should not be masked out (a face for example), ensure it is in the middle of the image.
- Always check how the image looks on all devices and make any necessary changes.
Shows live image area for ‘Full Width’ image display on desktop
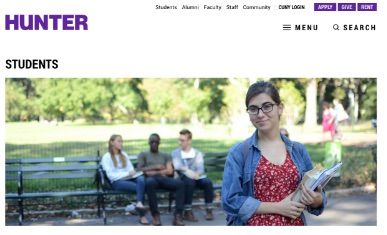
‘Full Width’ image display on desktop
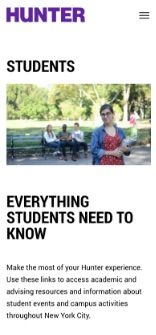
‘Full Width’ image display on mobile, shows entire 1600x900 image.