Search Knowledge Base by Keyword
Add Special Features
This page includes:
Introduction to Shortcodes
The Basic Content Editor is a tool in the Basic Content Module of the WordPress CMS where shortcodes can be added to create special forms and features on the page.
A shortcode is a small piece of code, indicated by brackets like [this], that performs a dedicated function. It can be placed anywhere inside the Basic Content area.
All the shortcodes below can be used in the Basic Content Editor.
Note: When adding shortcode, use the Text tab inside the Basic Content module to avoid bringing in unwanted HTML formatting that may break the shortcode (the WYSIWYG converts some HTML characters when switching from text to visual tabs. For example, " and ' will be converted to “ and ‘).
Simple Tables
Tables should be used for presenting rows and columns of simple data. For tables containing more complex or large amounts of data (where sorting, search and pagination are desired), use a Data Table Module.
Create a table
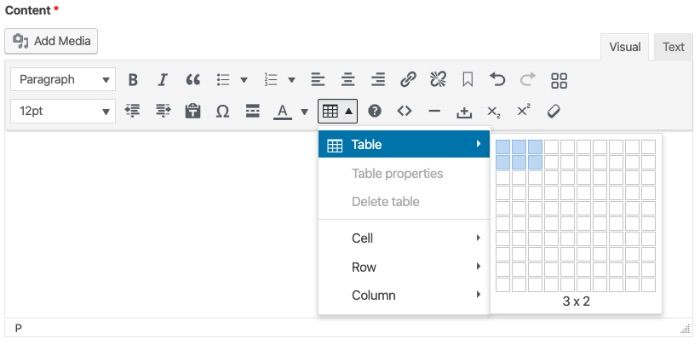
Inside a Basic Content module form you can insert a table from the top menu.
Format table
Adding Your Data - When building your table, try to include as few columns as possible (this will also display on mobile devices).
Adding/Deleting Rows or Columns - You may add or delete rows or columns by clicking in the desired area, selecting the table menu again and selecting the option needed.
Column Width - You can alter the width of columns by dragging the dividers.
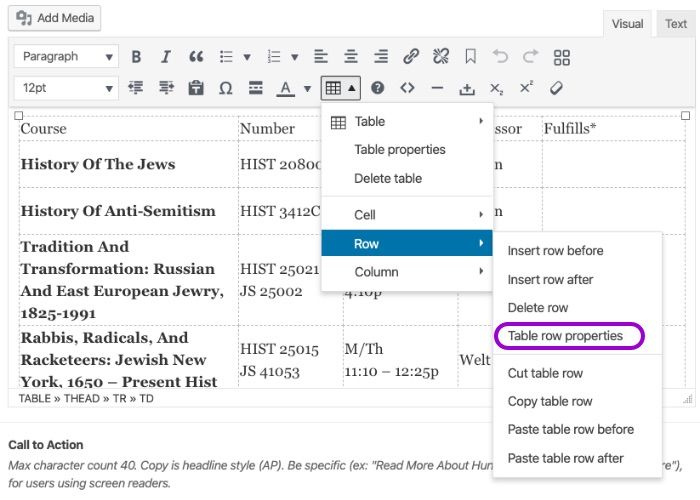
Header - Create a header by selecting the first row, and finding the Table row properties in the menu and change the Row type to Header.
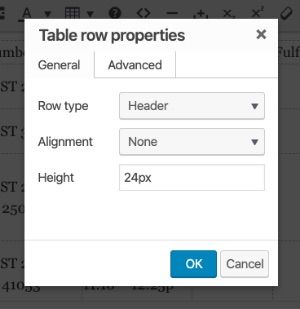
In the Table row properties module select Header in the Row type.
Jump Links
Jump links provide users with more information about what is on the page as well as an easy way to 'jump' to that information. This page, for example, features a bulleted list of jump links at the top.
- Use jump links as a bulleted list of links at the top of a page that contains many sections.
- You may link from another page to a jumped link down a page by including the desired 'jumpto' id (for example: /kb/wysiwyg/#tips).
Important: Top of page must include a Basic Content Module
- In the WYSIWYG field of the Basic Content moudle must include a bulleted list of links that include the jumplink shortcode.
- Each jump link includes a unique name, all in lowercase, to refer to the link.
Two Ways to Link to Jump Links in Hunter's WordPress Theme
- Jump links within Basic Content Modules
- Jump links that use a module's Section ID
#1 Jump Links Within Basic Content Modules
- Jump links must be created in the WYSIWYG field. The Basic Content module, as well as others, include a WYSIWYG field.
- The link you are jumping to may be in another Basic Content module in the page, as long as that module has an H2 inside a WYSIWYG field.
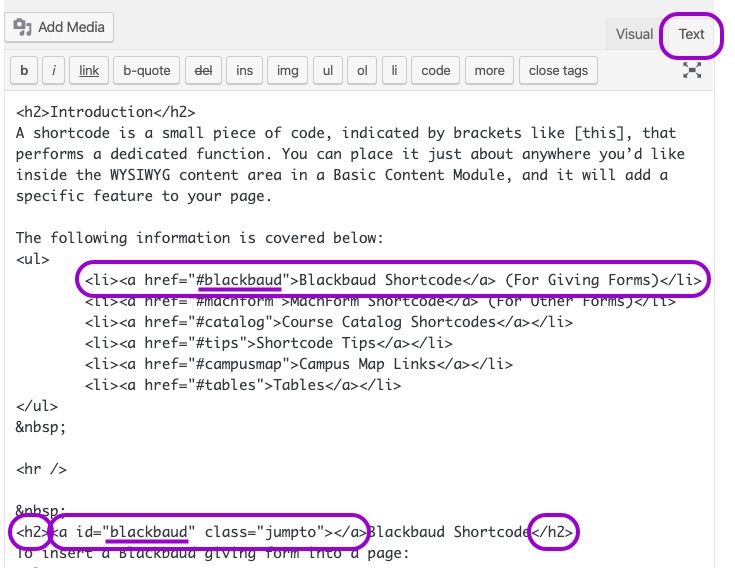
Important parts of the jump links code: You must be in the text tab, you must add links to the bulleted list and you must include the 'jumpto' code to each H2 that you wish to jump to.
How to Create Jump Links within Basic Content Modules
-
- In the first module with a WYSIWYG field, create a bulleted list of the items that will become jump links. The items should be initial caps and they should match the corresponding H2 heading.
- IMPORTANT: Switch to the Text tab (see example above). Text tab allows you to insert basic code into the page.
- Find the bulleted list of H2s you created.
- For each bullet:
- Add <a href="#uniquejumpname"> in between <li> and your title.
- Add </a> after your title and before </li>
- Replace uniquejumpname with a short jump title that refers to the title, no spaces. See underlined example above. This is how you tie the top link to the jump link, so they must be identical words (no spaces).
- For each H2:
- Find each H2 down the page and add <a id="uniquejumpname" class="jumpto"> after <h2> and before the title.
- Replace uniquejumpname with the the corresponding short jump title for each H2.
- Preview the page and test the jump links.
#2 Jump Links That Use a Module's Section ID
- Follow instructions 1 - 4 above to create the links at the top of the page.
- In order to link to the module, put the uniquejumpname in the Section ID of the module you wish to jump to. Most modules contain the Section ID at the top of the module container.
- When you want to link to that jump link from another page. View your live page, click on your jump link and copy that url that will include #uniquejumpname at the end. Paste that in as your link.
Call to Action Links
For more prominent links with Basic Content Modules. Call to action links are fields available at the end of most modules to enable users to see more about the content for that module. This code enables the same style link to be used within Basic Content Modules. These should be used for more prominent links.
[calltoaction linktext='link text' linkurl='http://url.com' linkstyle='text']
To apply the CTA link
- Copy the code below
- Paste it where you would like it to appear within a Basic Content Module
- Replace "text" with "button" to use a button style CTA. Button styles should be used only where you'd like to use a Big Button but need it more closely associated with the content. Do not add more than 1 Button style CTA per page.
- Replace "http://url.com" with the url of where the link should go. (Note the quotation marks must be included)
Add Call-to-Action Arrow to a Link
To make a link in the Call-to-Action style (with the long arrow at the end).
Normal Links
[calltoaction linktext='link text' linkurl='http://url.com' linkstyle='']
- Copy the entire line above. Using the Text tab within a Basic Content module, paste it where you want this to appear within your content.
- Replace link text with the desired link copy.
- Replace http://url.com with the desired url you are linking to.
- Always test the link after adding it to make sure it is set up correctly.
Example:
Learn More
Campus Maps Links
Select a location from the list below, copy the URL that appears below the select box, and paste it to the text you want to include as a link in your content.
Example of adding a link in your content to a specific location on the Campus Map:
68th Street Campus Visitor's Center
Giving Forms (Blackbaud)
Giving forms are used on Hunter giving pages using Blackbaud shortcode.
To insert a Blackbaud giving form into a page:
- Obtain a Blackbaud code by sending a request to website_feedback@hunter.cuny.edu.
- The shortcode will be the code below swapping out 'long ID number' with the code you receive.
- Using the 'Text' tab within a Basic Content module, insert the entire line of code.
- The form will appear wherever the code is placed. You may have content before/after the form.
[blackbaud id='long ID number']
Other Forms (MachForm)
Other types of long-standing forms may be inserted into a page using MachForm. These forms collect information and allow users to register for an opportunity or submit questions or documents for review. Each Hunter department has their own MachForm Admin Panel. Contact website_feedback@hunter.cuny.edu to get access.
To insert a MachForm into a page:
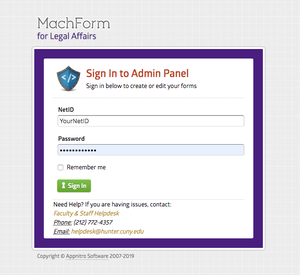
In MachForm
- Sign In to your department MachForm Admin Panel.
- Create your form and save with a unique name.
- Go to Code. Make sure WordPress Shortcode is selected and copy the line of code.
In WordPress
- Using the Text tab within a Basic Content module, paste the code.
- The form will appear wherever the code is placed. You may have content before/after the form.
Example of a Machform Shortcode:
[machform dir='legal' id='10224' height='1155' title='OFFICE OF LEGAL AFFAIRS INTAKE FORM']