Search Knowledge Base by Keyword
Revisionize
This page includes:
About Revisionize
Revisionize can be used to make updates and get them approved before posting. It's designed to help make big changes without fear of disrupting the current page. For example, use Revisionize when new modules need to be added to a page, or edits need to be made to several existing modules.
How Revisionize Works:
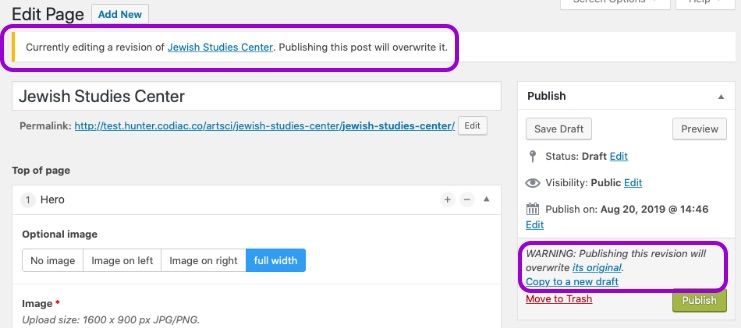
- Creates a copy noted as a "Revision Draft" that can be edited and approved before posting to the live site.
- Once approved, publishing the "Revision Draft" replaces the original with the newly revised version. The original then becomes the "Revision Draft" so it's easy to revert if needed.
How to Use Revisionize
Step 1: Find the item you need to change

- When hovering over the name to display functionality, choose Revisionize. This will create a new page identical to the one selected.
The Revisionize version of the page in WordPress
- This new page will be a copy of the original page.
- It will have the same name, but it will be called a "Revision Draft" and use the original page as its Parent Page, which is how it will be referred to in the list of pages.

Step 2: Make changes
- Make changes to the Revision Draft.
- Check the changes on multiple devices.
- Then SAVE AS DRAFT - always keep in Draft mode until approved. Do not Publish.
Step 3: Get approval
- See Get Approval for more information.
Step 4: Publish
- Once approved, Publish the Revision Draft.
- Now the updated page will be live. The original page now becomes the Revision Draft.
- When you're happy with the update, put the Revision Draft (the original) in the Trash and then choose "Delete Permanently" in the trash.
If you need to swap back
- Simply Publish the Revision Draft (the original), and it will swap out with the updated version of the page.