Search Knowledge Base by Keyword
Create a New Page
This page includes:
Add New Page
New Page Template Overview
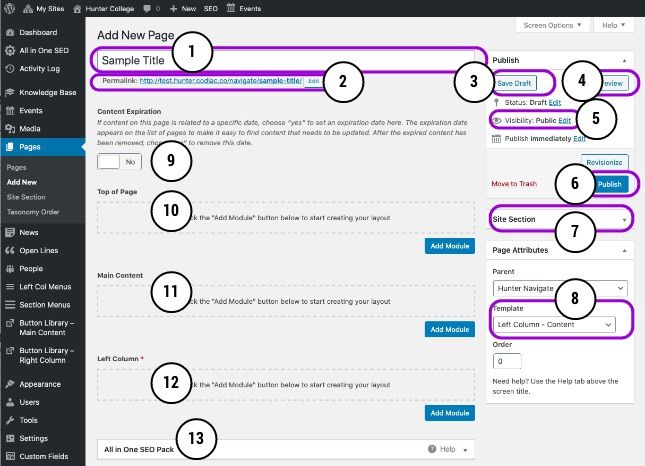
Numbers refer to annotations in the graphic above.
- Page Title (#1)
- Page titles should be title case, short and unique.
- Permalink (slug) (#2)
- This is what the actual URL will be. This will be automatically created by WordPress, but can be manually edited.
- Publish Module (#3-6)
- Save Draft - saves page without publishing it to live website
- Preview - view page as it will appear when published
- Visibility - who can see this page, where to add password protection. See below for more information
- Publish - push the page to production (live website)
- Site Section options (#7)
- Designate the site section of the page. See below
- Template selection (#8)
- Select which Page Template to use.
- Content Expiration (#9)
- Add if content is related to a specific date with Content Expiration
- Top of Page (#10)
- Main Content (#11)
- Left Column/Right Column (#12)
- Options for adding Left Column or Right Column modules depending on the page template chosen
- All in One SEO Pack (#13)
- Include meta titles (55-60 characters) and meta descriptions (155-160 characters) when creating new pages. For all titles, end with “ | Hunter College” (ex: About Hunter’s Legacy | Hunter College). Meta titles should be unique.
Steps to Build a New Page
Basic steps to build a page. Numbers refer to annotations in the graphic above.
Step 1 - Add Page
- If you want to start with a copy of another page, clone that page
- If you want to build a page from scratch, choose Add New Page
Step 2 - Set Up Page
- Designate a site section - do this first (#7)
- Select a template (#8)
- Add page title (#1)
- Add password protection (if needed, see below) (#5)
- Turn on expiration (if needed) (#9)
Step 3 - Add Content
- Add Top of Page Modules (if needed) (#10)
- Add Main Content Modules or Feed selection, depending on page template (#11)
- If Left Column Template - add desired left column menu (how to create left column menu) (#12)
- If Right Column Template - add desired buttons and/or modules to the right column (more about library buttons) (#12)
Step 4 - Review
Before getting approval, ensure content...
- Meets website Goals
- Follows Hunter's Editorial Guidelines
- Follows Hunter's Photo and Video Permissions
- Has been checked on all devices (desktop, tablet and mobile)
- Has appropriate SEO (#13)
and Get Approval
- Save draft of page (#5)
- Follow steps to Get Approval
Step 5 - Publish
- Once approved, Publish the page
- Again, check on all devices (desktop, tablet and mobile)
Add a Password
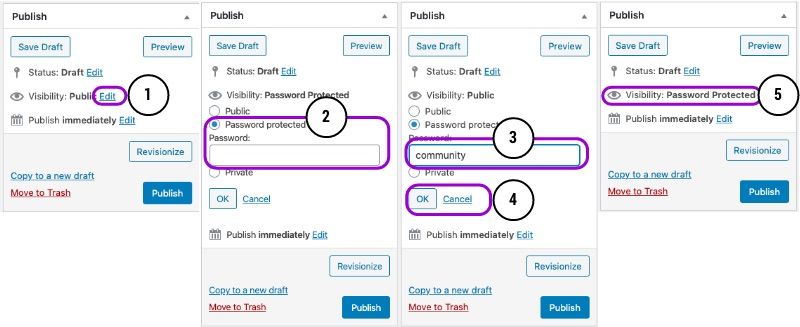
Password protection allows you to publish a page without fear of public visibility. This is helpful when building new pages that need to be shared with others before they are published. The page may only be viewed by typing in the password. Make sure to include the password along with the url when sending it for review or approval.
Note: Pages with password protection will all say 'Protected' before the page title until the password is removed and the page is republished.
To Add a Password
- In Publishing, select Edit in Visibility
- Select Password Protected
- Add a password - something short and directly related to the content (easy to remember).
- Click OK
- Visibility will now display Password Protected
To Remove a Password
- Edit visibility again
- Select Public
- Click Publish
Site Section

Site Section files the page in your section which means:
- The right people can access and edit the page
- A selection must be made before publishing
Learn more about Site Sections.
Selecting a Parent Page
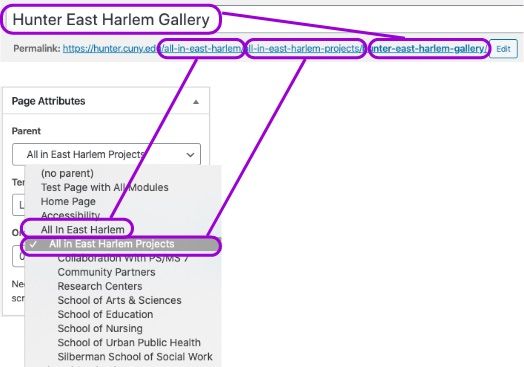
Nested Pages
See Page Attributes: Parent
- In order to nest the pages appropriately in Hunter's website page hierarchy, pages are under parent pages.
- In the Parent dropdown, page hierarchy is displayed as indented. That is carried out in the Permalink (slug) that is automatically generated. (The page name is appended to the end.) See graphic above.
- The page name and the slug do not have to match exactly; in some cases it's better to have a shorter slug.